Table of Contents or Collapse to Hide
Circle of Friends Quilt Sew Along
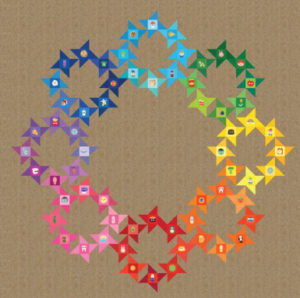
- Circle of Friends free pattern can be found HERE on the Robert Kaufman website. A few of us on social media have graciously collaborated with me to do a motivation sewing project. I asked a new blogging friend, Jenny, to request sewing buddies to join us. We chose to do the Circle of Friends pattern in a Christmas theme since it will be August tomorrow. Plenty of time to sew with the new circle of friends I have met online. The quilts finished size is 71″ x 71″. I will personally be hanging this on a wall but you may choose to use it on a couch or bed.
Since blogging last October, I rarely had time to sew. I have never done a sew with me before and I hope it’s something I will be able to do more often. Hopefully, this will get my creative juices flowing again and will desire me to sew more projects.
Fabric Suggestions
I highly suggest purchasing only cotton fabrics. I never use anything but cotton and or linen for my quilts. Try and purchase higher quality cotton as you will want this to last a long time.
This post will not be a beginner sewing course, I am going to assume you already know the basics of sewing. Please visit Jenny at her blog for great how-to tutorials and awesome high-quality fabric lines. Jenny’s blog (aka Yellow Rose Jenny) can be found Yellow Rose Jenny Quilt Shop.
Fabric Prep
I personally always wash all my fabric. If the weather permits, I will hang the fabric on the line to dry naturally. I rarely use the dryer to dry my fabric. If it’s raining, I drape the fabric over a clothes rack on the covered porch to dry. While the fabric is still damp; I spray the fabric with starch and iron stiff before sewing the squares. I spray the squares again before cutting out into half-square triangles.
If I only have a few pieces of yardage, I hand wash them in a camper washer and recycle the water to my outdoor plants. For handwashing, I use an all-natural laundry soap that I make for handwashing. Since 5 yards is the background alone, I opted to wash all the fabric together in my washer. I prefer to save water whenever possible but this is too much yardage to handwash in the little compact washer.
I do not use any fabric softener in the fabric. If there is a lot of red or black, I will use straight vinegar in the fabric softener dispenser to help the fabric set and not bleed. This is purely my preference and is optional.
Circle of Friends Cut Sheet
Click Circle of Friends Cut Sheet 07.30.2019 for an excel sheet that I created to print out and mark off if you choose. If for some reason this does not open, please leave a comment and I will directly email it to you or paste it into the body of this blog. On my original sheet, I replaced “Color 1” with the actual color I will be using for this quilt. Please feel free to change and save it to your files as you please.
Circle of Friends Fabric Colors
I am actually making 2 of these right now and shamelessly purchased colors for fall. lol, The first one I already cut out is in ombre colors. I wanted to film the actual cutting out of this pattern in order to give tricks and tidbits. Since we agreed to do a Christmas theme, I will be using that as my documentation. If you are following the pattern, you will see 8 different colors and one solid background. Each color only takes 1/3 of a yard with leftovers. The background color I chose for this Christmas quilt is black. The background for my other 2 wallhangings will be a tea-dyed muslin.
Quilting Notions
Basically, a ruler, rotary mat and rotary cutter are all you may need, besides a sewing machine. If you didn’t have those, you could cut out the pieces with scissors. I have been sewing for, I will say longer than 30 years and leave it at that, (lol). I have accumulated quite a few sewing aides along the way. The slotted ruler and the Accuquilt dies are my particular favorites sewing tools. These tools help me immensely with my fibromyalgia in my wrists and arms.
Accuquilt and why I use it
There are many reasons for using the Accuquilt. I started using it over 5 years ago. I find it invaluable in helping with my fibromyalgia pain in my wrists and hands. Even Elenor Burns from Quilt in a Day has moved to the Accuquilt whenever possible. She also has an injury (arm) that prevents her from too many repetitions cutting with a rotary and ruler.
You do not have to invest in Accuquilt, but if you do, you’ll probably wonder how you ever got along without it. Often, I wonder this myself. They offer custom dies cut to your specifications. I ordered a die for a project I was working on for little squares minus a smidge that you won’t find in any die. Designing it made it unique for me! I love it, it makes it so easy to do a whole wall hanging in no time.
Notions for this project: See “SHOP” section at the end for some of the links for the products:
- Sewing Machine
- Gauge (optional)
- Fabric
- Starch-Heavy
- Ruler
- Rotary Cutter
- Rotating Swivel Cutting Mat (optional)
- Iron
- Iron-Press (optional)
- Accuquilt Go (optional)
- Accuquilt 5″ Square Die #55010
- Cotton Thread (neutral)
- Cotton Bobbin Thread (neutral)
- Wooden Rolling Pin (optional)
- (2) 3-pound hand weights (optional)
- Numbered Straight Pins (optional)
Cutting Fabric for Circle of Friends Quilt
You may have your own way of cutting fabric. I am sharing how I prepare my fabric for quilting. Please choose whatever works for you and share if it’s something you’d like us to try. I am always open to new ideas and tips and tricks.
- To follow along, print out the excel sheet or save to your desktop
- Cut out the background
- Cut out all the color pieces
It is best to cut the longest pieces first since the leftover on the strips can be used for the smaller pieces that are needed. I always tear the fabric to get straight of grain, starch, iron then cut into pieces.
Fussy-Cut Centers
I have opted not to do a fussy-cut in the center of each star but rather use the same fabric as the star. You may choose to fussy-cut any center you that you prefer. See the excel workbook, sheet 1 called “circle of friends”. I am choosing to do a solid center (column c). Ensure if the fussy-cuts are directional, remember to place them in the correct direction so they won’t be upside down in the finished quilt. To see more about the fussy-cut process, please visit the Robert Kaufman web site Circle of Friends Pattern. For this quilt, I will not be making fussy-cuts.
Circle of Friends Background Cuts
It is best to tear or cut off the selvage edge before tearing or cutting the strips
The Robert Kaufman sites cut the fabric on the WOF-(width of fabric) where I am cutting them on the length of fabric to optimize fabric and leave more length for the borders and binding. Please do what you feel is more beneficial to your sewing project. If you’d like to learn more about fabric grains, visit Jenny Beyer Why We Tear Our Fabric, she explains why she tears her fabric also.
Either follow the original pattern for cutting the fabric with a width of fabric or use what I am doing, tearing down the whole length of the 5 yards. Regardless, the amounts of cuts or pieces will still be the same, either way. If you are following the pattern, please scroll down until you see how to “sewing the half-square triangles”. Note: the number of pieces listed below is still the same, just the order and length of strips will vary.
- Tear one left edge to get a straight grain of the fabric-all the way down the 5 yards of fabric
- Snip a small cut at 7.5 inches and tear all the way down the 5 yards of fabric-from that, cut the following pieces sideways: (They will be squared later) Tear 2 strips of 7.5 inches the whole length for Sections 1 and 2.
Section 1 Background: Strip #1
- A-(4) 7.5 x 25.5 rectangles
- B-(4) 7.5 x 19 rectangles
Section 2 Background: Strip #2
- C-(8) 7.5 x 5.5 rectangles
- D-(8) 8″ squares
- E-(17) 3.25 x 7.5 rectangles
- F-(6) 3.25 x 5.5 rectangles
Section 3 Background: Read Carefully- you need 2 strips but after tearing one-STOP and cut Section 4 (1) 16. 5-inch square and then proceed to tear the next strip for section 3 and rest of the quilt:
- Snip a small cut at 5.5 inches if cutting the squares and tear all the way down the 5 yards of fabric-from that, cut the following pieces sideways: (They will be squared later).
- If using the die, tear the strip 5.75 inches and tear all the way down the 5 yards of fabric-from that, cut the following pieces sideways: (They will be squared later). Do either G-1 or G-2 Not both
- G-1(64) 5.5-inch squares if not using the Accuquilt die
- G-2(32) If using the Accuquilt die, tear the strips 5.75 x 10.5-the die cuts 2 so you only need half the cuts but double the length
- Tear one strip down the 5 yards-you will get (17) 5.75 x 10.5 rectangles then
- Stop and proceed to Section 4-(H)
- Once Section 4 is cut
- Proceed with the next 5.75 inches times the length of the fabric which will be approximately 4. 5 yards now that the 16.5-inch square was cut.
- ***Cut (15) 5.75 x 10.5 rectangles out of the second strip (you should have approximately 7.5 inches leftover)
- If you do not cut section 4 before cutting the 2 strips, there will not be enough wide fabric at this point to cut section 4 out later.
Section 4 Background:
- Turn the fabric to the width-wise
- H-(1) Cut a 16.5-inch square-(there will be very little leftover for scraps)
- Proceed back to Section 3 tearing the remaining strip See *** above
Section 5 Background:
- Snip a small cut at 3.25 inches and tear all the way down the 5 yards of fabric-from that, cut the following pieces sideways: (They will be squared later)
- I-(4) 3.25 x 16.5 rectangles
- J-(4) 3.25 x 10 rectangles
- K-(17) 3.25 x 3.25 squares
- There should be approximately 9 x 163 inches of fabric leftover
True cutting the rough-cut background pieces
Section 1 Background:
- (A) 7.5 x 25.5 inches–trim to 7.25 x 25.25
- (B) 7.5 x 19 rectangles–trim to 7.25 x 18.5
Section 2 Background:
- (C) 7.5 x 5.5 rectangles–trim to 7.25 x 5
- (D) 8 squares–trim to 7.25 square
- (E) 3.25 x 7.5 rectangles–trim to 2.75 x 7.25
- (F) 3.25 x 5.25 rectangles–trim to 2.75 x 5
Section 3 Background:
- (G) 5.5-inch squares –trim to 5-inch square
- (or use the Accuquilt 5″ die)***the die cuts 2 so you only need half the cuts-this will be for the 5.75 x 10 rectangles
Section 4 Background:
- (H) 16.5 square–trim to 16.25 square
Section 5 Background:
- (I) 3.25 x 16.5 rectangles–trim to 2.75 x 16.25
- (J) 3.25 x 10 rectangles–trim to 2.75 x 9.5
- (K) 3.25 x 3.25–trim to 2.75 squares
Circle of Friends Color Fabric Cuts
- Snip a small cut at 5.5 inches if cutting the squares and tear all the way down the 1/3 yards of fabric-from that, cut the following pieces sideways: (They will be squared later).
- Do this for all 8 colors
- If using the die, cut the strip 5.75 inches all the way down the 1/3 yards of fabric-from that, cut the following pieces sideways: (They will be squared later). Do either L-1 or L-2 Not both
- L-1(64) 5.5-inch squares if not using the Accuquilt die, 8 different colors times each color equal 64 total.
- L-2(4) If using the Accuquilt die, tear the strips 5.75 x 10.5-the die cuts 2 so you only need half the cuts but double the length. You will need 4 pieces 5.75 x 10 of each color.
- Refer to the Accuguilt 5-inch die paragraph below on how to assemble the background and each color together before using the Accuquilt.
Fussy-cut or solid color square centers:
Before cutting the next squares, heavily starch the fabric
You should have a straight edge from the 5.75 strips you just cut-no need to waste fabric
- M-(64) total of all 8 colors-2.75-inch squares-you should not need to leave extra before squaring up
- Color #1 (8) 2.75 x 2.75 repeat this for all 8 colors-you won’t need to true-up later-this is the final cut for these squares
- Color #2 (8) same as above
- Colors #3-#9-repeat as for color #1
True cutting the rough-cut color pieces
- (L-1) 5.5 squares–trim to 5-inch square
- (L-2) (or use the Accuquilt 5″ die)***none needed
- (M) None needed-cut exact measurement with a ruler
Using the Accuguilt 5-inch die
***If using the Accuquilt die, place a 5.75 x 10.5 inches of background and a color piece right sides together and make sure they are heavily starched! Leave a generous amount over the die blades. Cut 6 layers, 3 pairs of one background and one-color fabric. Right sides together this will be for G-2 background and L-2 (8) of each one of the colors.
Sewing the half-square triangles:
- Either follow the directions in the pattern by sewing 5 inches squares with a 1/4 inch seam around the outside of the background and color fabric, right sides together
- Draw a diagonal line down the center and sew 1/4 inch on each side and cut on the drawn line
- Buy half-square triangle paper piecing
- Or any other way you may wish to sew the half-square triangles
Sewing the blocks
If you are sewing the blocks in order or one color at a time, you will need to sew 1 block of every color before beginning block one. Every block uses at least 2 colors of the next or previous blocks. It’s very important to sew each block in order as per the directions. I do not recommend straying from the pattern. I sew with a scant 1/4 inch. Choose what will work for you. I am sewing across the top and down. One is being at 12 o’clock on the sheet (the light blue). The first row blocks I sew will be block number 8, then block 1 and finally block 2.
- 8
- 1
- 2
- 7
- Center Block
- 3
- 6
- 5
- 4
Cutting the half-square triangles:
Once the 5-inch square is sewn, let’s use the pattern to make it easier on everyone. Spray starch the square before cutting it in 4 pieces. If you have a steam press, this works excellent as there’s no movement to distort the fabric. If using a hand iron, move it up and down and not so much back and forth. Once the fabric is cut, it’s on the bias and will become easily distorted.
- Once the square is starched and cut on both diagonals, set the seam again
- Be very careful when pressing the seams
- Choose whether you’ll be pressing to one side or pressing the seams open
- There are many seams going into many directions for me, I will be pressing my seams open
Pressing the seams on the half-square triangles:
I use a wooden rolling pin to aid in setting the seams open without distortion. Please choose what works best for you. I may use a piece of batting to cover the rolling pin. This enables the square to adhere without moving. Many times I will cover the batting that goes over the rolling pin with a crisp piece of cotton. I have no preference, all depends on what mood I am in. LOL
Squaring the half-square triangles:
If you have a rotating cutting mat, now is the time to bring it out. Since the half-square triangles are on the bias, it’s better to handle them as little as possible. I am also using a 1/4 inch cutting ruler as I find this an invaluable tool! There are some rulers out there that you may cut the triangle before pressing the seams open. I use this method sometimes but you will still have to cut the “dog ears” off so it’s not worth it this time. Once the half-square triangles are squared to 2.75 square proceed with putting the block together, starting with block one. Once block one is completed, then move onto the block two and complete that before moving on and so forth.
Fabric Scraps and what to do with them
- Sliver fabric scraps, donate or use for dolls and pet beds
- Larger size pieces either save for applique, smaller squares or donate to a school or quilt shop
- Threads, save for the bird’s nest in the spring
Shop Here
We are a participant in the Amazon Services LLC Associates Program, an affiliate advertising program designed to provide a means for us to earn fees by linking to Amazon.com and affiliated sites.
You will not incur extra fees or charges for using the links. We only recommend items we believe in and have tried. If I personally make or sell an item, I will mention this in the post for each item.
Click on the Bar of Dish Soap to Visit Our Amazon Storefront!
- Gauge (optional) can be found on Amazon
- Starch-Heavy can be found on Amazon
- Ruler can be found on Amazon
- Rotary Cutter can be found on Amazon
- Rotating Swivel Cutting Mat (optional) can be found on Amazon
- Iron can be found on Amazon
- Iron-Press (optional) can be found on Amazon
- Accuquilt Go (optional) can be found on Amazon
- Accuquilt 5″ Square Die #55010 can be found on Amazon
- Cotton Thread (neutral) can be found on Amazon
- Cotton Bobbin Thread (neutral) can be found on Amazon
- Wooden Rolling Pin (optional) can be found on Amazon
- Numbered Straight Pins (optional) can be found on Amazon
If you do decide to try something mentioned in the blog post; always do a patch test on your forearm or side of the hand to ensure you are not allergic or having an adverse reaction to the product(s).
Pingback: Farmhouse and Primitive Christmas stocking patterns - Farmhouse-bc
Circle of Friends Sew Along Welcome! I m so excited to be sewing along with Jersey from Farmhouse Basic Collection (Go to her blog now people if you haven t visited her already! She s one of the good people in the world.) Jersey has created a cutting sheet to help you out with getting started on how much fabric you ll need. Get Read More
I am so excited to have a quilting friend with Jenny! She also has a blog post about this too, see the post here for her website. She is also giving away prizes because she is sooo sweet. You’ll love her site, Yellow Rose Jenny 🙂
Pingback: Circle of Friends Sew Along - Yellow Rose Jenny